The Golden Hour Opportunity!
Lighting is everything in photography. That’s my theory anyway! I always love taking photos, but when the golden hour light gets super dreamy, dramatic, or wild, my creativity goes through the roof. I’ve been doing this for 20 years, but it’s only in the last five that I have truly experimented with different lighting techniques for photographers.
Before that, I was strict about backlight because it created perfect, even skin tones for my clients. No matter the lighting conditions, I strive to capture the very best light possible because it defines my style and enhances the emotion of my images. Here are my golden hour photography tips!
In this tutorial, I’ll walk you through how I captured three very different images in just six minutes during a golden-hour shoot last summer.
The Location and Setting
On this evening, I had a high school senior photo shoot that also included some family photos. It’s common for my clients to request a few quick family portraits during senior sessions, but they usually don’t want to take too long, so I need to work efficiently.
The sun was about to set, but it hadn’t quite dipped behind the mountains yet. This gave me a small window of time to capture different lighting effects before it disappeared completely. Understanding how to use the golden hour in photography and how it changes minute by minute helped me make quick decisions and maximize my time.
How I Work Quickly in Changing Light
When working under rapidly changing light conditions, I:
- Keep the energy up by constantly engaging with my clients.
- Explain the golden hour lighting situation so they understand why we’re moving quickly.
- Give constant direction and encouragement to keep them excited and natural in front of the camera.
- Take multiple shots quickly to ensure I capture the best expressions and positioning.
By keeping the session dynamic, I ensure my clients feel confident while maximizing the variety of images I deliver.
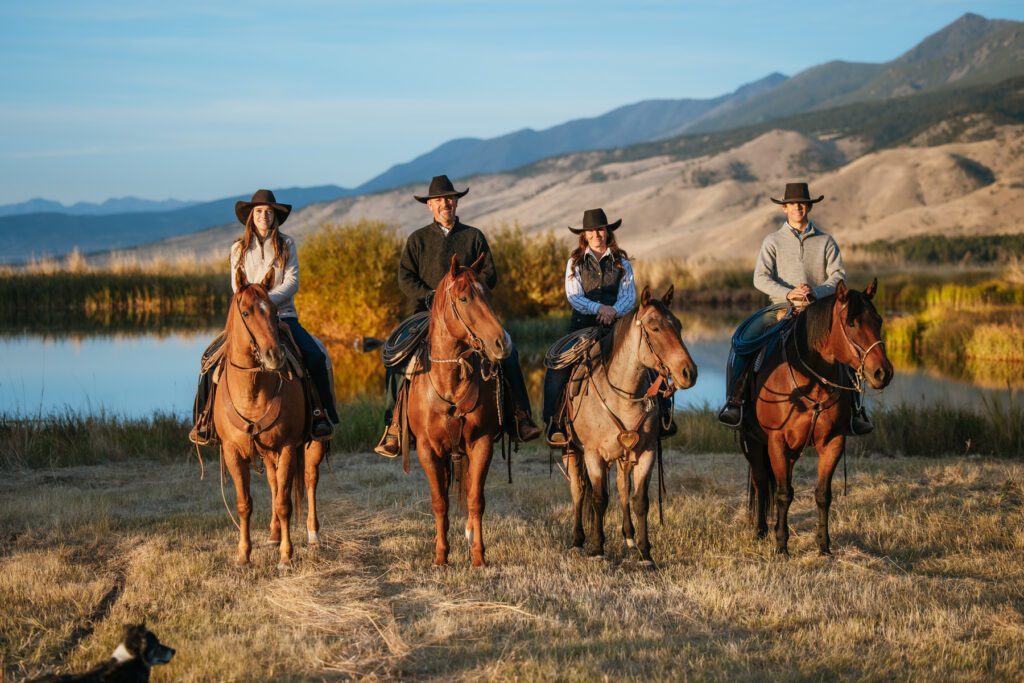
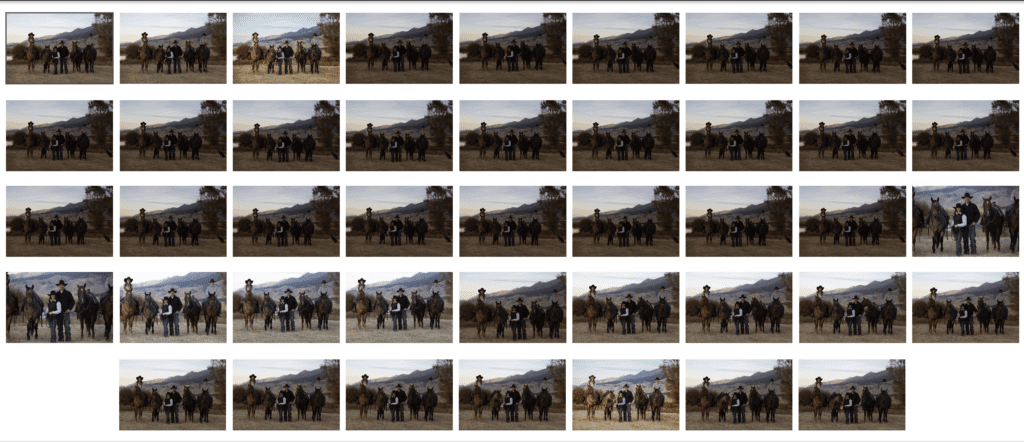
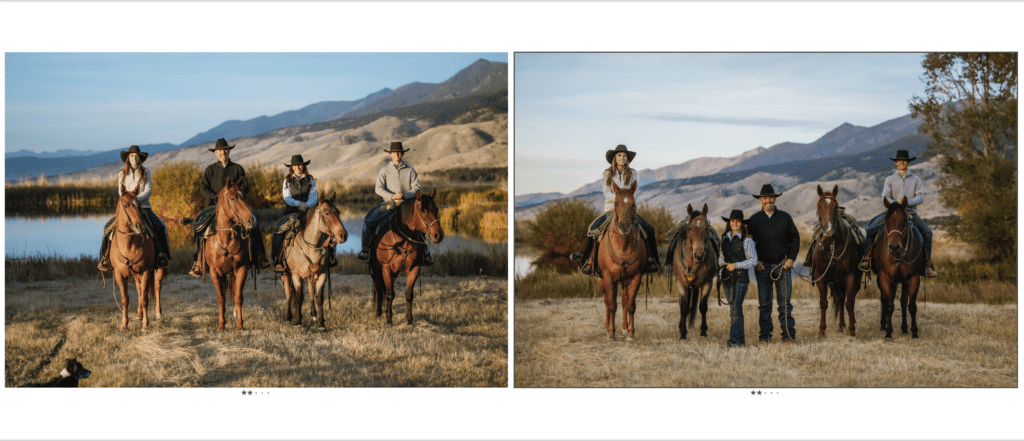
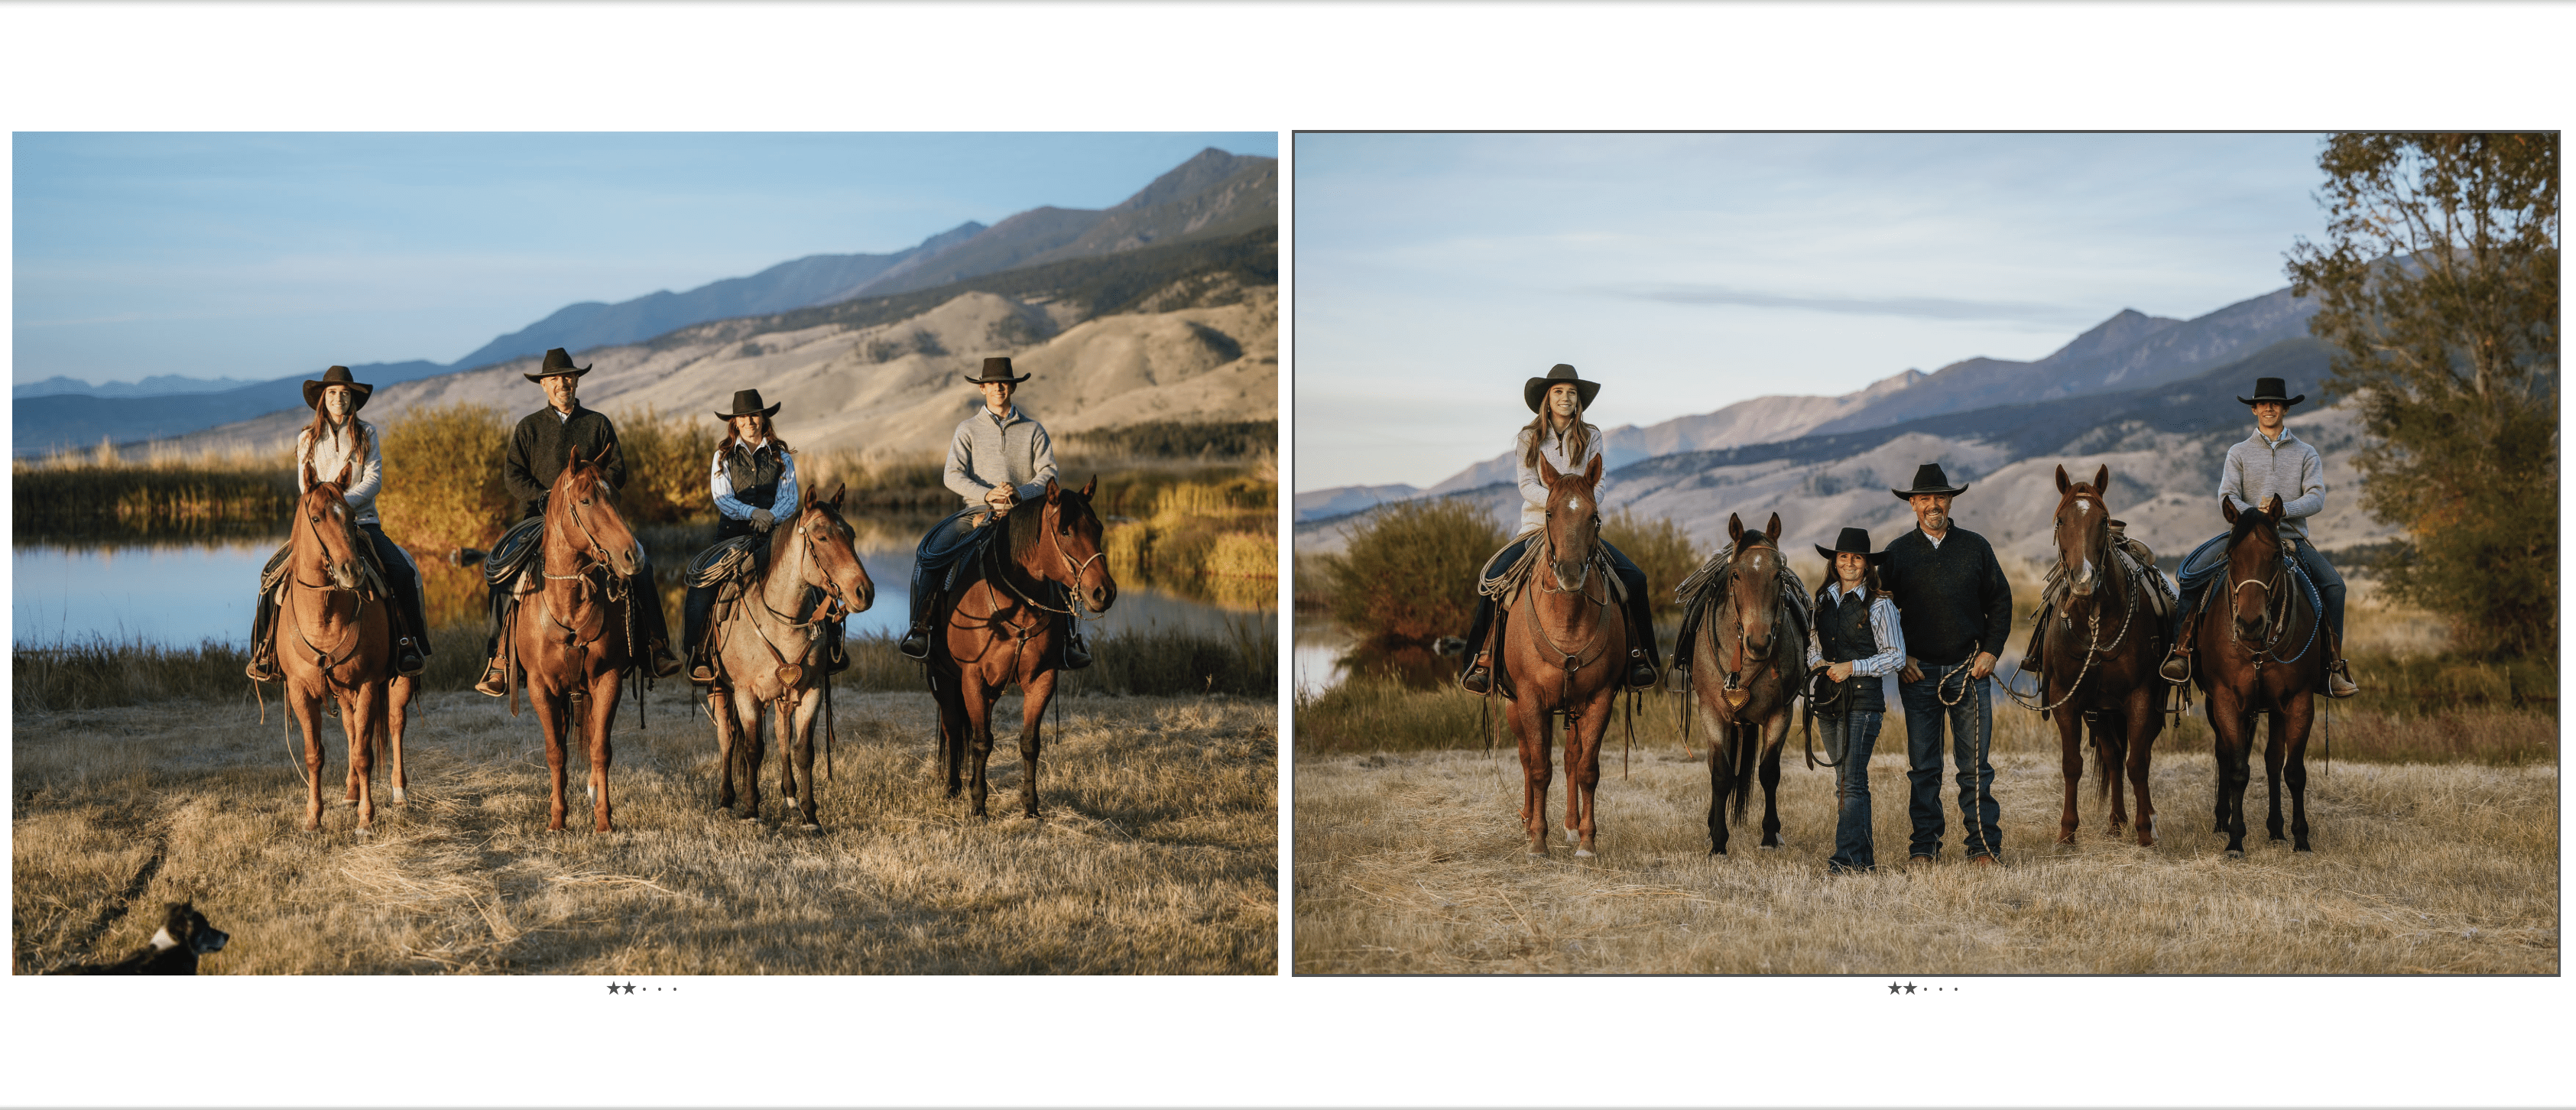
First Shot: Side Lighting for Contrast at Golden Hour
Time: 6:41 pm
Settings: F2.8 | 1/500 sec | ISO 100
At this point, the golden hour sun was still above the mountains, creating strong contrast. Instead of avoiding this, I embraced it to add depth and dimension to the image.
How I Used Natural Light for Depth:
- I positioned my subjects so that the light hit them from the side, casting shadows on their left (our right).
- This directional lighting created a bold, dramatic feel.
- I ensured my exposure settings protected the highlights while leaving enough detail in the shadows to adjust in post-processing.
Pro Tip: When working with outdoor portrait photography, make sure your subjects are slightly staggered so shadows don’t fall awkwardly across their faces. I quickly assessed the scene and made snap decisions about positioning. Sometimes, I plan ahead, but often, I trust my instincts. At this point, the sun was still above the mountains, creating a strong contrast on my subjects. This is a situation I used to avoid, but now, I embrace the bold look that side lighting provides. This is just one way of utilizing golden hour.
This lighting technique for photographers creates depth and dimension, giving the photo a bold and dynamic feel. If you look at this shot in-camera, you might think the shadows are too harsh. However, with modern cameras’ dynamic range, you can pull a lot of detail from the shadows in post-processing.
You can see in the first slide that I did not have them in the light, so I moved them forward a little bit. I then made sure to make adjustments on the angle that their line made it to the sun so that Koyle, all the way to the right, still had light on his face.
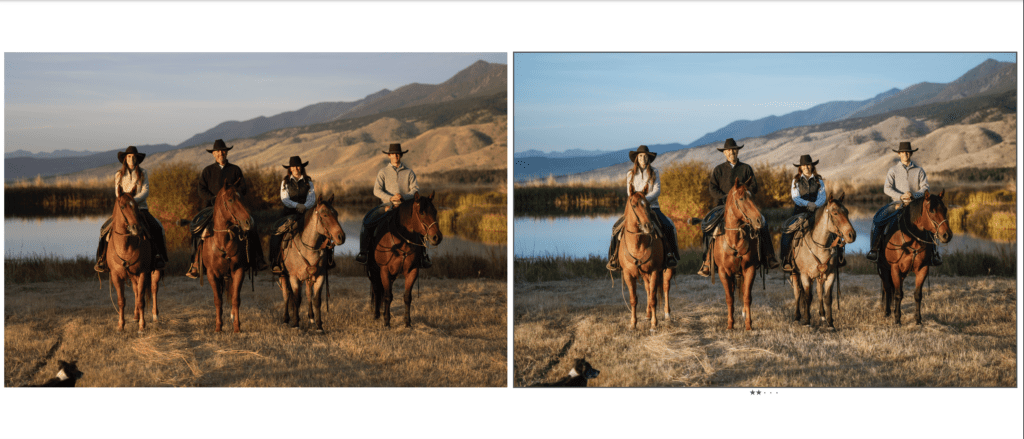
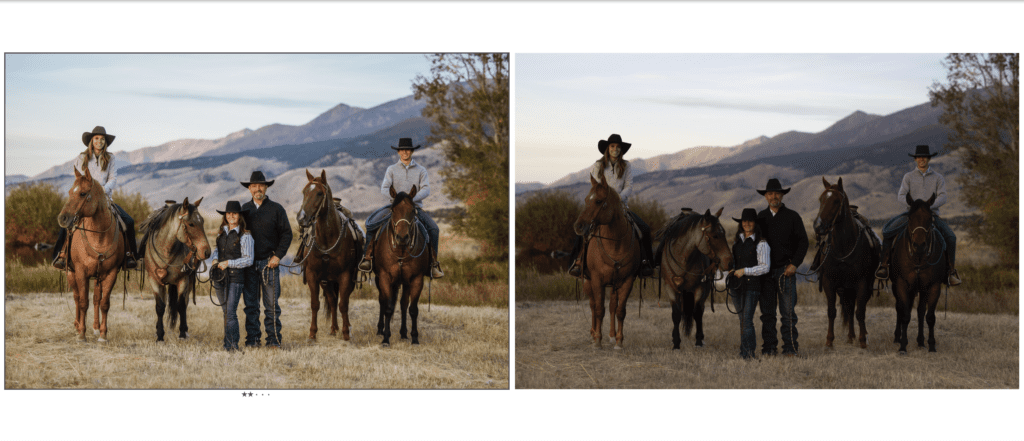
The raw image on the left and the edited image on the right.
Pro Tips for Shooting in High Contrast Golden Hour Light
- Expose for the highlights to avoid blowing out details.
- Keep subjects slightly angled to prevent unwanted shadows on faces.
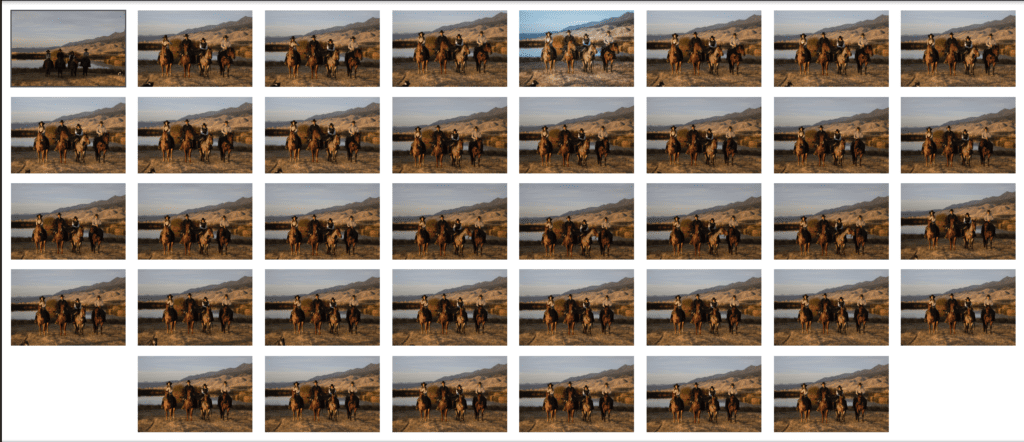
- Take multiple shots—especially when working with horses or groups. In this case, I took 37 images to ensure good expressions and positioning.
Handling Horses in a Group Photo
Whenever I work with horses in portraits, I take a lot of photos—sometimes 30+ in a single pose. This helps ensure:
- The horses’ ears are forward (a key detail for equestrian photography).
- All subjects are looking at the camera with natural expressions.
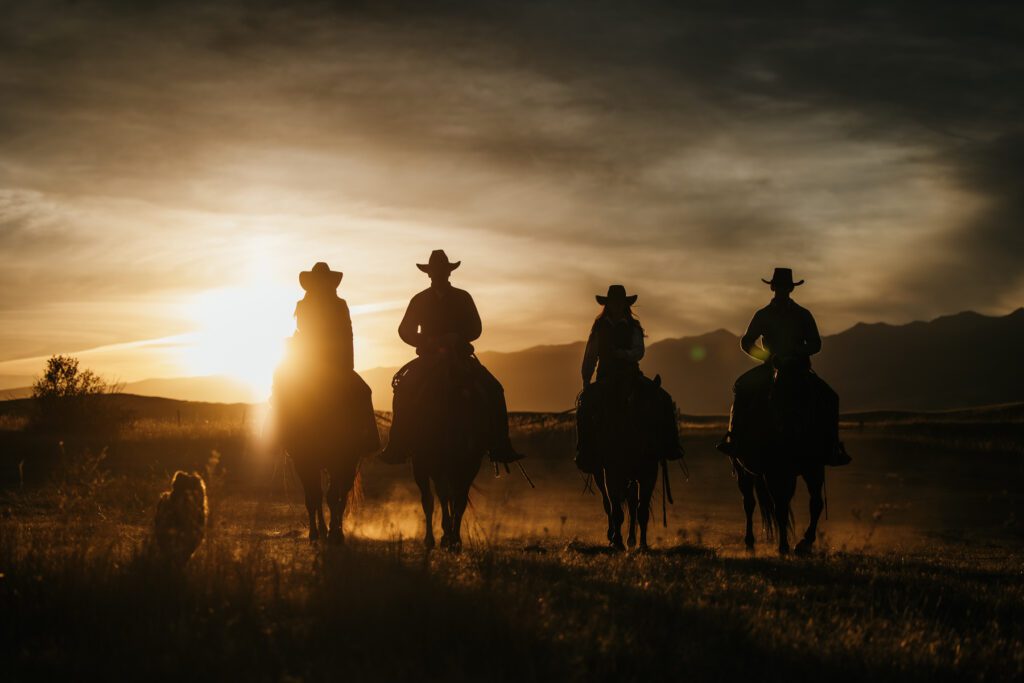
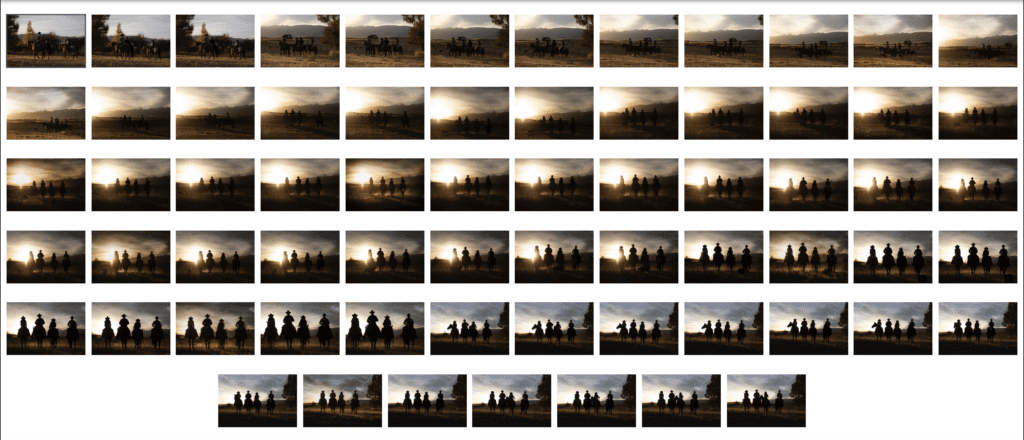
Second Shot: Golden Hour Silhouette for Drama
Time: 6:43 pm
Settings: F2.8 | 1/6000 sec | ISO 100
Once I had captured a strong side-lit shot, I transitioned to a silhouette photography setup. Golden hour was nearly coming to a close so I had my clients ride a short distance, then turn and face me with the sun at their backs. At this point, the sun was just hitting the top of the mountain.
By exposing for the sky, I created a dramatic silhouette, where my subjects stood out against the colorful background. Since I needed to darken the image, my shutter speed increased significantly to 1/6000 sec. Knowing that the sunset light was fading fast, I captured a variety of shots—both posed and in motion.
How to Shoot Silhouettes at Sunset:
- Position subjects with their backs to the sun to create contrast.
- Expose for the sky, not the subjects, to achieve a crisp silhouette.
- Use a fast shutter speed to maintain sharp details in bright conditions.
Since I was working fast, I captured a variety of shots, including both posed and motion-based images.
Pro Tip: Silhouette photography works best when subjects have clear, defined shapes—riders on horseback are perfect for this!

The raw image on the left and the edited image on the right.
Third Shot: Blue Hour Soft, Diffused Light for a Gentle Glow
Time: 6:46 pm
Settings: F2.8 | 1/180 sec | ISO 100
By now, the sun had dipped behind the mountains, creating beautifully soft, diffused light. At this moment, I would consider the golden hour over and the blue hour beginning. I turned my subjects toward the last bit of light, which gave their skin a natural glow. The softer contrast made their faces stand out beautifully against the background.
If you look closely at this shot, you can also see the alpine glow on the far mountains, adding an extra touch of warmth to the scene. This is called blue hour! I have started to utilize this more for several reasons. You can see that my people are no longer squinting like they were in the first shot. I love catching Alpenglow in the background when I can. I love the soft muted colors that Blue Hour creates.
Why I Love Shooting at Blue Hour:
- The light is warmer and more even, enhancing skin tones.
- The contrast is softer, making subjects pop against the background.
- The colors become dreamy and ethereal.
Extending a Photoshoot Beyond Sunset
In the past, I used to wrap up my sessions right at sunset, but I’ve since learned that some of the best images happen in the 15–30 minutes after the sun disappears. If you’re in an open area where light can still bounce, you can capture stunning soft light portraits even after the sun is gone.
The edited image on the left and the raw image on the right.
Best Camera Settings for Golden Hour Photography
- Lower your shutter speed to let in more light after sunset.
- Turn your subject to face the remaining light for a warm, natural glow.
- Experiment with white balance to keep tones soft and natural.
I used to avoid shooting after sunset because I felt like the lighting wasn’t ideal, but I’ve since learned that soft light in outdoor photography can be incredibly flattering. Now, I regularly shoot for up to 30 minutes after sunset, especially in open areas where the light still bounces and reflects.
The Power of Quick Adaptation During Golden Hour
In just six minutes, I captured three distinct images with completely different moods to best utilize golden hour and blue hour. This ability to adapt quickly to changing photography lighting conditions is key to delivering this kind of variety in a short amount of time:
- Impresses clients by giving them multiple options.
- Keeps the session efficient and stress-free.
- Showcases your skill in handling different lighting situations.
When you understand how to shoot in changing light conditions, you can work confidently in any scenario and maximize every photo shoot.
Which image do you prefer? The sidelight of Golden Hour on the left or the Blue Hour on the right??
Want to See How I Edited These Golden Hour Shots?
If you’re curious about how I enhanced these images in post-processing, let me know! I’d love to create a video showing my editing workflow, including:
- Editing golden hour photos for warmth and richness
- Balancing highlights and shadows in high-contrast images
- Bringing out detail in silhouettes without losing depth
Let’s Connect!
Do you have any questions about lighting techniques for photographers or how to shoot in changing light conditions? Comment below or reach out—I’d love to help!
For more photography tips for beginners, check out my YouTube channel or book a Coaching Session for one-on-one training.
You can also check out my lighting guide for free HERE!
Happy Shooting!
Kate


+ show Comments
- Hide Comments
add a comment